Showing posts with label Treatment. Show all posts

Modern Windows Treatment Ideas 2011


New Neutrals


Designer Lori Gilder says "charcoal and slate are the new neutrals and blend beautifully with the metallic trends." This darker neutral frames a window elegantly and adds a more sophisticated look to your room. Design by Genevieve Gorder.


Jewel Tones


Window treatments in jewel tones, which range from deep reds to subtle blues, are sophisticated and create the atmosphere of luxury in any space. Designer Jennifer Duneier says, "Jewel tones, like amethyst and turquoise, are popular mixed with soft metallics such as platinum or brushed nickel." Image Courtesy of Casa Fiora.


Stainless Steel


Not just a favorite for appliances anymore, stainless steel is making its way throughout the home. To incorporate this trend into your window treatments, designer Lori Gilder suggests threading stainless steel and other metallic curtain rods through simple eyelets at the top of panels to create a simple unadorned look. Design by Erinn Valencich.


Cheery Yellow


Brighten up a room with cheerful draperies. According to designer Lori Gilder, "Yellow epitomizes warmth and a sunny outlook toward the future.


Layer Shades


"Another trend is to layer shades," says Jennifer Duneier. "A blackout shade might be installed right next to the window with a sheer shade in front of it.


Metallics


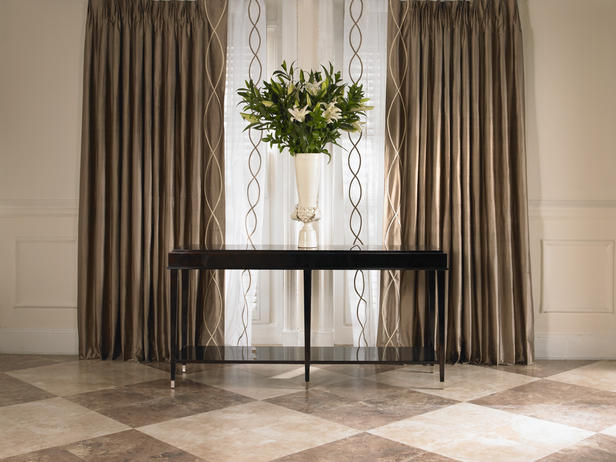
"Metallic surfaces are back in vogue," says Lori Gilder. "Silver, bronze and gold metallic fabrics layered with sheers are making a grand appearance in living rooms and bedrooms. The simple layering of these metallics draped from a classic metal rod blends beautifully with the latest color trends.


Trim It Up


Personalize window treatments with decorative embellishments. Designer Jennifer Duneier uses trim to create custom-designed treatments. Tapes with shells or buttons attached to them are becoming more popular as well.


Natural Elements


Organic materials are bringing nature indoors. "It’s all about nature-inspired and eco-friendly materials and designs," says designer Lori Gilder. "It’s no longer a trend, but more of a philosophy in the evolution of design. Bamboo, matchstick blinds and natural woven shades layered with simple sheer linen panels create an elegant yet earthy sophistication in any space.


Let the Light In


One trend that's always in style is using window treatments that allow a lot of natural light into the space. Designer Jennifer Duneier suggests to "use simple panels of sheer fabrics to add warmth to the room but still let light through. Many fabric houses are making fabulous sheers in all colors, not just white or cream. They're also using great linen blends with more contemporary patterns. Design by Andreea Avram Rusu.

Posted in , , , | Leave a comment

2013 Bedroom Window Treatment Ideas from HGTV

Window treatments can set the tone of your bedroom's style. Check out these ideas to add color, pattern and drama to your space.


Serene Entrance 

Designer Troy Beasley placed white silk draperies at the bedroom's entrance instead of over the windows to avoid blocking the stunning city view. The white draperies and bedding offer a soothing environment, while pops of yellow bring life into the space.


Floor to Ceiling Luxury 

Designer Tracy Morris hung over the top, floor to ceiling draperies to cover up the large windows in this regal bedroom. The soothing blue color of the drapes is implemented in the ceiling treatment, bedding and furniture for a unified look. Gold accents enhance the luxurious feel of the space.


Dark, Soothing Color 

Using dark colors in a bedroom can make the space feel cluttered and small when used incorrectly, but these chocolate brown draperies set a soothing tone against the lavender walls of this contemporary bedroom. To bring some sparkle to the space, designer Joseph Pubillones hung a mirror above the bed.


Bold Pattern 

Bright colors, whimsical patterns and inviting accessories make visitors feel welcome in this guest bedroom designed by Erinn Valencich. The bold patterned, floor to ceiling window treatments stand out against the soft blue walls, making it the bedroom's statement piece.


Room Divider Drapes 

Draperies don't only have to cover up windows. Designer Vanessa DeLeon hung sheer gold draperies to separate the bedroom from the living room in this studio apartment. A curtain rod spanning the room's ceiling makes it easy to open and close the curtains.


Bedroom Focal Point 

The dramatic gold draperies create a focal point and spruce up the wall behind the bed. Designer Troy Beasley paired the draperies with an over-the-top velvet headboard to bring texture to the space. The two toned drapes give the illusion of a higher ceiling, which makes the room feel larger.


Dual Material Draperies 

Decorating your space with dual material draperies adds interest to a neutral space. In this guest bedroom, designer Ammie Kim chose a sheer material to cover the windows to allow natural light to stream in. A bold, velvet material on the bottom of the drapes anchors the space.


Posted in , , , | Leave a comment

15 Easy Window Treatment Projects for Autumn 2013

What's one surefire way to make a room looked polished and finished?

Dress up the windows. Whether they are DIY treatments or store bought versions, drapes, shades, valances, or any of their cohorts will take your rooms from bland to wow.


Take plain white curtains up a notch with a simple flower embellishment. To create the rosettes, trace around a 3 inch diameter drinking glass on the flower fabric. Repeat until you have five same size circles per rosette. Cut out circles and fold into quarters. Hold all the quarter circles in your hand and stitch together with a needle and thread at the base of the flowers. Create the number of rosettes that you want and stitch them to a pair of curtain panels, alternating heights. Run a bead of fabric glue from the flower to the bottom of the curtain panel. Place a length of green yarn on the glue, wrapping it under the bottom edge of the panel and gluing to the back of the curtain. Cut leaf shapes from green cotton fabric and position next to the yarn. Sew a straight stitch down the center and around the edges to secure.


Put scraps to use as fresh window treatments. We used sheer scraps to create a soft, shimmery effect. Choose your fabrics and plot out the pattern for the panels on grid paper to scale. By using grid paper, you can determine the dimensions of each fabric piece you'll be cutting. Label each section according to the fabric used. We used seven different sheers to get this effect. Cut fabric and pin together in rows. Stitch the pieces into rows, then stitch the rows together. Sew a rod pocket and the side and bottom edges to finish.


Set your windows apart with dyed linen strips. Start with sheer white linen and cut into strips. Divide the strips into four or five groups. You'll dye each group a different shade. We created five different colors using red and yellow crafts paint. Mix 1 tablespoon of crafts paint to 1 gallon of water and stir. Test the dye on a scrap of linen. Experiment with colors and saturation levels before you dye your final strips. Once you're happy with the color, plunge a length of fabric into the mixture. Remove and hang to dry. Repeat until you're satisfied with the mix of colors. Iron the dry fabric to set the color. Line up the strips in alternating colors, then tie to a curtain rod. Cut the fabric strips to the desired length. (These were cut short to create a cafe curtain.)


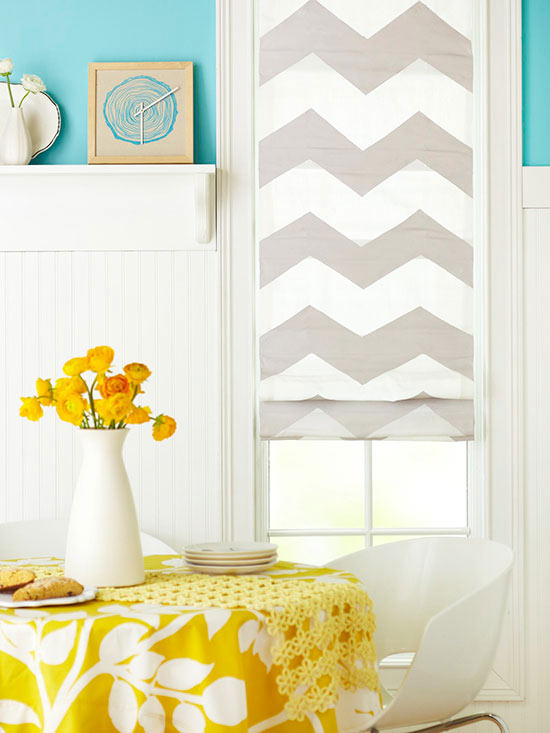
Go geometric and paint a chevron design onto a plain shade. To make a chevron stripe, determine the center point of the fabric on the Roman shade and position the pattern for pleasing symmetry. We allowed for 4 inch stripes. Use a plastic artist's triangle tool (or create your own triangle shape out of cardboard) and pencil to trace lines onto the shade. Use a straightedge to make sure the chevron stripes are level. Tape above and below the pencil line with painter's tape. Repeat for each stripe. Use a brush or roller to paint on fabric paint. Remove the painter's tape and install the shade once the paint is dry.


Create custom marbleized fabric that starts with a design you create on paper. Click the link below to learn how to marbleize paper and then upload your design to a fabric printing service (we used Spoonflower), order your fabric, and sew it into basic drapes.


Made from a miniblind and midweight upholstery fabric, this Roman shade can be assembled in a matter of hours. First, lay the blind on your work surface with the front facing down. Set the length by adjusting the plug underneath the thick bottom slat according to the package instructions. Next, snip away only the strings that connect the slats on both sides. Maintain the slats at 7 inch intervals; snap off and remove the rest. Place the fabric facedown under the blind. Mark the fabric where it folds at the sides, top, and bottom of the slats. Remove the shade and press the fabric folds. Place the fabric under the shade, then glue the sides of the fabric to each slat and the top and bottom edges of the fabric to the top and bottom slats. Use clothespins to hold the fabric in place while it dries.


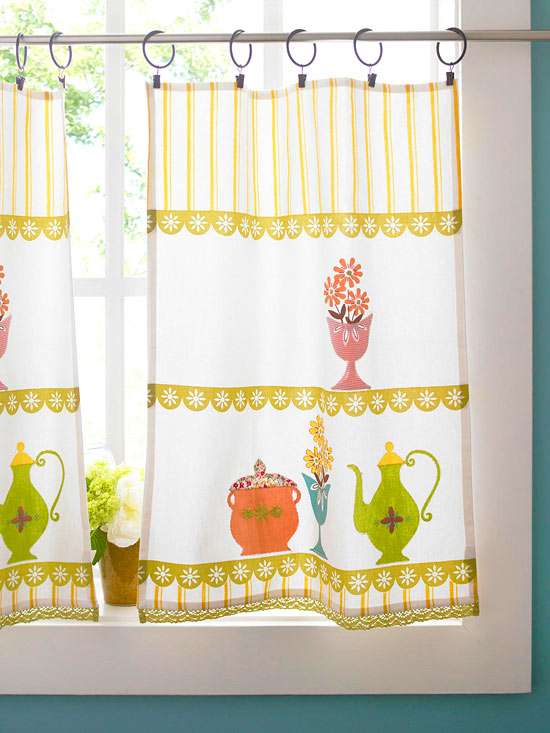
To create these pretty cafe curtains, purchase two 16x24 inch tea towels. Install curtain rods at your desired height. Attach ring clips to the top of the tea towels to hang them from the rod. If the towels hang past the windowsill, measure the fabric, cut off the excess, and hem the towels using a sewing machine or fusible web and an iron.


Add waves of color to plain white panels by progressively dyeing with two colors of acrylic crafts paint. We paired deep blue and teal. Dip the damp fabric into a solution of 1 tablespoon crafts paint per 1 gallon of water. Add more paint to the mixture and dip the lower portions of the curtain repeatedly to achieve an intense color.


To make a peacock-print valance like this one, start by cutting a 2x4 piece of wood to the width of your window. Buy enough fabric to extend 6 inches on either side and 4 inches longer than the desired length. Finish the hem and sides, and embellish with a fun fabric trim. Wrap fabric around the wood and staple into place. Attach the wood to the wall with screws or L brackets.


You can make these pretty curtains using solid color flat sheets. Cut each panel to twice the window width and 6 inches longer than the desired length. Sew a rod pocket along the top. Hem the panels to floor length. Make the ruffles by cutting strips of fabric twice the width of a panel by 4-1/2 inches, then sew a 1/2 inch hem. Sew a basting stitch along the raw edge. Gather the fabric to the width of the panel. Starting at the curtain's bottom hem, pin overlapping ruffles to the panel and stitch them into place. Attach the top ruffle upside down, right sides together, and flip over to hide the raw edge.


When curtain panels won't fit or simply aren't needed, use an easy sew valance like this one to add softness and color. Sew a rectangle to the window size, adding a rod pocket at the top. Stitch a length of wide ribbon on each end of the valance, 4-6 inches from the outer edge. Drape the ribbon over the top of the valance so there is a length of ribbon running down the back and the front of the valance. Stitch the ribbon into place and use each ribbon tail to tie up the fabric.


You can dress up purchased tab-top panels with a bit of trim attached to the edges. Or get a similar look by making your own panels. You can buy yardage at a fabrics store, but you can also shop for table coverings or linens in the kitchen, bedding, and bath section of your local department store. There you will often find discounted or discontinued fabric items that you can cut up and use as yardage.


Don't toss out curtains you love just because they don't fit your new windows or need to be replaced. Instead, cut and sew them into panel style window shades with rod pockets. Tension rods hold the shades in place and make them easy to change or remove. This trick also works to make outdated fabrics or drapery styles look trendy again.


For a simple update, give drapery panels a makeover with tiebacks. An easy to make tieback adds a polished look and a splash of the room's yellow accent color to this window treatment.


With a little ingenuity and basic sewing skills, you can get the look of custom made window treatments for way less. Start with a neutral drapery (maybe one you've had for years but now want to update) and sew a contrasting fabric to the bottom, measuring from the bottom edge of the window to the floor. Cover the seam with beaded trim or ribbon. This idea is great if you have recently moved and need to lengthen your old draperies to fit the scale of your new home.

Posted in , , , | Leave a comment

2014 Cheap and Easy Window Treatment Projects Ideas

If you have bare windows, we have plenty of quick,cheap, easy, and affordable solutions to get you covered.

 You'll love these ideas to try in 2014! I hope you find these ideas useful and inspiring to you .... Enjoy it !!!!


Tuck and Fold : An orgami inspired folding technique turns plain window sheers into a one of a kind creation. To create the curtain, purchase two sheer window panels. Cut the first into equal size squares. Lay the other panel on the floor. On the squares, pin opposite corners in the center of the square. Then lay the pinned pieces on the full panel in a pattern of your liking, overlapping the corners slightly. (We repeated an X shape to cover the lower portion of the sheer.) Hand sew centers at the pins.


Flower Power : Take plain white curtains up a notch with a simple flower embellishment. To create the rosettes, trace around a 3-inch diameter drinking glass on the flower fabric. Repeat until you have five same-size circles per rosette. Cut out circles and fold into quarters. Hold all the quarter circles in your hand and stitch together with a needle and thread at the base of the flowers. Create the number of rosettes that you want and stitch them to a pair of curtain panels, alternating heights. Run a bead of fabric glue from the flower to the bottom of the curtain panel. Place a length of green yarn on the glue, wrapping it under the bottom edge of the panel and gluing to the back of the curtain. Cut leaf shapes from green cotton fabric and position next to the yarn. Sew a straight stitch down the center and around the edges to secure.


No-Sew Roman Shade : Made from a miniblind and midweight upholstery fabric, this Roman shade can be assembled in a matter of hours. First, lay the blind on your work surface with the front facing down. Set the length by adjusting the plug underneath the thick bottom slat according to the package instructions. Next, snip away only the strings that connect the slats on both sides. Maintain the slats at 7-inch intervals; snap off and remove the rest. Place the fabric facedown under the blind. Mark the fabric where it folds at the sides, top, and bottom of the slats. Remove the shade and press the fabric folds. Place the fabric under the shade, then glue the sides of the fabric to each slat and the top and bottom edges of the fabric to the top and bottom slats. Use clothespins to hold the fabric in place while it dries.


Embroidered Inspiration : Embroider a favorite saying or quote on curtains to make a fun statement. Measure the width of your panel. Cut kraft paper to that width, and write cursive words or letters on the paper in pencil. Trace the lettering with thick black marker on the paper, then tape the paper to the back of the curtain panel so the letters show through. Trace the words on the fabric using a 4b art pencil or white chalk. Following the lines, embroider a simple straight stitch using all five strands of embroidery floss.


Chevron Shade : Go geometric and paint a chevron design onto a plain shade. To make a chevron stripe, determine the center point of the fabric on the Roman shade, and position the pattern for pleasing symmetry. We allowed for 4-inch stripes. Use a plastic artist's triangle tool (or create your own triangle shape out of cardboard), and pencil to trace lines onto the shade. Use a straightedge to make sure the chevron stripes are level. Tape above and below the pencil line with painter's tape. Repeat for each stripe. Use a brush or roller to paint on fabric paint. Remove the painter's tape and install the shade once the paint is dry.


Embellished Bamboo Blinds : Off-the shelf bamboo blinds become a custom window treatment with ribbon and a little bit of glue gun action. We layered two different types of grosgrain ribbon on the edge of this blind. Glue the middle ribbon on first, then glue on the top and bottom ribbons, overlapping them slightly with the middle ribbon. For all ribbons, tuck the ends under the edge of the blind and secure to the back for a polished look.


Fringed Cafe Curtain : Set your windows apart with dyed linen strips. Start with sheer white linen and cut into strips. Divide the strips into four or five groups. You'll dye each group a different shade. We created five different colors using red and yellow crafts paint. Mix 1 tablespoon of crafts paint to 1 gallon of water and stir. Test the dye on a scrap of linen. Experiment with colors and saturation levels before you dye your final strips. Once you're happy with the color, plunge a length of fabric into the mixture. Remove and hang to dry. Repeat until you're satisfied with the mix of colors. Iron the dry fabric to set the color. Line up the strips in alternating colors, then tie to a curtain rod. Cut the fabric strips to the desired length. (These were cut short to create a cafe curtain.)


Lovely Lace : Get a lush, feminine look on a budget with DIY curtain panels decked out in low cost doilies and lace remnants. To begin, cut sheer fabric into two panels to fit your window. Finish the edges with no-sew adhesive strips. In a bucket, mix fabric dye with water until the desired saturation is achieved, then dunk the doilies in the dye. Remove and let dry, then attach the doilies to the curtain panels in a random pattern using a hot-glue gun. For a cropped look, adhere a few doilies along the edge and trim accordingly. To finish, glue a lace remnant to the bottom of the curtain, leaving an inch or so extra on either side to fold over and finish the edges.


Marbleized Curtains : Create custom marbleized fabric that starts with a design you create on paper. Click the link below to learn how to marbleize paper and then upload your design to a fabric printing service (we used Spoonflower), order your fabric, and sew it into basic drapes.


From All Angles : Plain curtain panels require no more than stitched-on triangles in various hues of satin to become eye-catching. Select a few fabrics in coordinating colors and patterns. Cut out triangles in various sizes, and sew the shapes in a free-flowing pattern.


Patchwork Drapes : Put scraps to use as fresh window treatments. We used sheer scraps to create a soft, shimmery effect. Choose your fabrics, and plot out the pattern for the panels on grid paper to scale. By using grid paper, you can determine the dimensions of each fabric piece you'll be cutting. Label each section according to the fabric used. We used seven different sheers to get this effect. Cut fabric and pin together in rows. Stitch the pieces into rows, then stitch the rows together. Sew a rod pocket and the side and bottom edges to finish.


Tea Towel Curtains : To create these pretty cafe curtains, purchase two 16x24-inch tea towels. Install curtain rods at your desired height. Attach ring clips to the top of the tea towels to hang them from the rod. If the towels hang past the windowsill, measure the fabric, cut off the excess, and hem the towels using a sewing machine or fusible web and an iron.


Dressed-Up Curtain Panels : A cottage style room would look amazing with windows dressed in these flirty curtain panels. Start with purchased panels and add the ruffle yourself.


Accessorize with Tiebacks : For a simple update, give drapery panels a makeover with tiebacks. The easy to make tieback here adds a polished look and a splash of the room's yellow accent color to this window treatment.


Flowy and Fabulous : You can dress up purchased tab-top panels with a bit of trim attached to the edges. Or, get a similar look by making your own panels. You can buy yardage at a fabrics store, but you can also shop for table coverings or linens in the kitchen, bedding, and bath section of your local department store. There you will often find discounted or discontinued fabric items that you can cut up and use as yardage.


Simple Striped Draperies : Striped draperies add interest to this mostly neutral dining room. Striped fabric like this is easy to sew, even for beginners, because the stripes provide straight-line guides. Affixing clip-on rings to the top of each panel ensures they remain easy to take down and clean.


Ombre Drapes : Add waves of color to plain white panels by progressively dyeing with two colors of acrylic crafts paint. We paired deep blue and teal. Dip the damp fabric into a solution of 1 tablespoon crafts paint per 1 gallon of water. Add more paint to the mixture and dip the lower portions of the curtain repeatedly to achieve an intense color.


Tie-Up Valance : When curtain panels won't fit or simply aren't needed, use an easy sew valance like this one to add softness and color. Sew a rectangle to the window size, adding a rod pocket at the top. Stitch a length of wide ribbon on each end of the valance, 4-6 inches from the outer edge. Drape the ribbon over the top of the valance so there is a length of ribbon running down the back and the front of the valance. Stitch the ribbon into place and use each ribbon tail to tie up the fabric.


DIY Ruffled Curtains : You can make these pretty curtains using solid color flat sheets. Cut each panel to twice the window width and 6 inches longer than the desired length. Sew a rod pocket along the top. Hem the panels to floor length. Make the ruffles by cutting strips of fabric twice the width of a panel by 4-1/2 inches tall, then sew a 1/2-inch hem. Sew a basting stitch along the raw edge. Gather the fabric to the width of the panel. Starting at the curtain's bottom hem, pin overlapping ruffles to the panel with hem side down, and stitch them into place. Attach the top ruffle upside down, right sides together, and flip over to hide the raw edge.


Posted in , , , , | Leave a comment
Powered by Blogger.

Interior design, interior decorating, interior decoration, interior designing ...